Hifi and Audio, myths, truths and rip offs(and a lot about me)

My background has been in what was once simply called Hifi but now encompasses, multichannel home theatre but basically I am a music lover and have been involved in this industry for well over 50 years. I was introduced to Hifi at a very early age, as my nextdoor neighbour was a jazz loving HiFi nut who made his living repairing electronics. Another Neighbour was also an electronics technician and a HAM radio operator, who in the 50’s built his own TV. Being able to communicate with people all over the world via HAM radio was something I found fascinating as a young child so I decided to try and obtain my HAM radio operators license which involved having a basic understanding of electronics, so both my neighbours helped me learn.

As a teenager, with the help of my Dad, I fitted speakers to my bedhead that Dad and I had built, which I plugged into my clock radio. Now I fitted 2 I had liberated from old radios, so technically it could play stereo but my clock radio only had a mono output. I didn’t care though as listening to the music from the radio was such a joy and music would become a massive part of my life, as it is for many people.

I also convinced my parents to let me learn to play guitar. Naturally that led to getting a small electric guitar and amplifier set up. A few years later the amplifier stopped working so I thought I would have a poke around inside and see if i could find the problem. Now at this point I had successfully dismantled an old radio my Dad had found but I hadn’t worked out how to get it going. This is where I learned a valuable lesson. I was carefully disconnecting the amp from power, then pushing on connectors and then plugging it back in and turning it on to see if would then worked. Then I forgot to disconnect it and touched a live wire. It was the only time I got a 240 Volt blast and luckily it threw me backwards, so I didn’t get electrocuted and die, but I did learn. A valuable lesson that I do NOT recommend.

When I was about 17 my brother turned 21 and his friends got him a high end Pioneer component car audio system with a separate radio, cassette player and amplifier and a pair of speakers. So as the guy who at this point understood about electronics I was tasked with fitting it into his car. This resulted in his friends and my friends also wanting me to install systems into their cars. At this stage I rode a motorbike so before I had gotten a car I had installed about a dozen car audio systems. I also set up a few home hifi systems too.

Now another neighbour got me into photography in my early teenage years and that was my passion. I studied physics with an emphasis in particular on light. It was an incredible time as holographs had just been invented and I was lucky enough to see and study all about them which obviously involved learning about wave theory and particle theory, and lasers and other cool stuff. Little did I know but that was a great grounding for audio as things like standing waves and wavelengths were something I already understood, as many of the same theoies of light waves applied to audio waves.

Now life often has a way of things converging that you haven’t planned but can work out for the best. For me I got into my photography but lost the passion for it, doing wedding photography. Now I love weddings but not working at them and thankfully I have got back into photography but am grateful to not do it for work. One of my photos I took while I studied photography was exhibited at the Victorian National Gallery which was quite an honour. Any way I ended up working in various jobs related to audio for many years until I had a bad motorcycle accident and had to have a serious think about where I wanted to go into the future. I had formed a good relationship with my local car audio store over the years, so while going through rehabilitation, I mentioned to the owner I would be looking for part time work while I recovered and he hired me on the spot.

I didn’t know it at the time but this was an incredible blessing as Chris the owner(R.I.P) was an engineer who had worked for Motorola, and Alpine car audio came originally from Motorola. Now our store was at the time doing amazing work and we did things well beyond the scope of most car audio stores. For example, we fitted out the cars that did the first mapping for GPS based navigation systems in my country. We were also the only outlet given Alpine F#1 status accreditation, to fit the first 2 generations of the F#1 system in my country. We had a great relationship with Alpine Japan and during my time there we had several visits from various Alpine executives including the President. On one visit I spent a great deal of time with the head of engineering discussing amplifiers. This directly lead to him designing and building the MSV-1050 which was only sold in Australia and Japan and is considered by many one of the best amplifiers Alpine ever made. It was a twin mono design, which was through my input as I has explained the benefits of zero crosstalk for staging and imaging to the head of engineering. I am not saying he was unaware of this but it was the first and I believe only stereo amp they ever made of twin mono design. All the other stereo or multi channel amps didn’t do this as it didn’t allow the amp to be bridged and that was a very versatile feature all their amps had. Bridging an amp allows you to combine a stereo pair of channels into one channel and dramatically increase the power output.

During my time there I did Alpines G.A.I.T. (Global Alpine Institute Training) which was arguably the most advanced training at the time. I also did Rockford Fosgate RTTI (Rockford Technical Training Institute) training as well as Phoenix Gold, MTX, Pioneer, and many others. I then got involved in car audio Sound Quality(SQ) competition. Initially as a judge as I didn’t have what I felt was a worthy competition system. I was later on the IASCA Commitee and became head national judge, and trained many judges over the years. In competition we evaluated cars on spectral balance, imaging and staging, safety, and other factors including integration. Now personally I wasn’t a fan of the integration part as I didn’t think it was relevant and it could lead to cars that had amazing installs but didn’t sound quite as good as another car, winning, and for me as a purist I felt it should be about the best sounding car. Later we developed a series where install wasn’t part of the judging criteria in particular classes. We had show classes and non show classes that excluded installation judging. These became the toughest to win as you couldn’t get extra points for spending large amounts of time or money or both on a fancy install and the system had to sound good in pure SQ judging. You didn’t get extra points for the head unit lighting matching your gauge lighting for example.

Over the years I listened to 100s of cars evaluating how well they performed, which was a valuable experience as it totally eliminated any brand bias and taught me a lot about just listening. I have also installed 100s of systems and I also won both and national SQ championships in pro class. A lot of hifi enthusiasts dismiss car audio as they believe any road noise ruins audio performance which is fair enough but car audio competition wasn’t done with vehicles driving and most competitors and car audio enthusiasts go to great lengths to use sound deadening products to help reduce road noise dramatically. I would actually argue that due to the hostile environment with mixed surfaces like reflective glass, plush seats, the off centre seating position, and other factors, we had to learn far more to get great results compared to home audio where you sit in the middle with fairly consistent room environments. Digital Signal Processing(DSP) was in car audio well before it was used in HIFI like it is today.

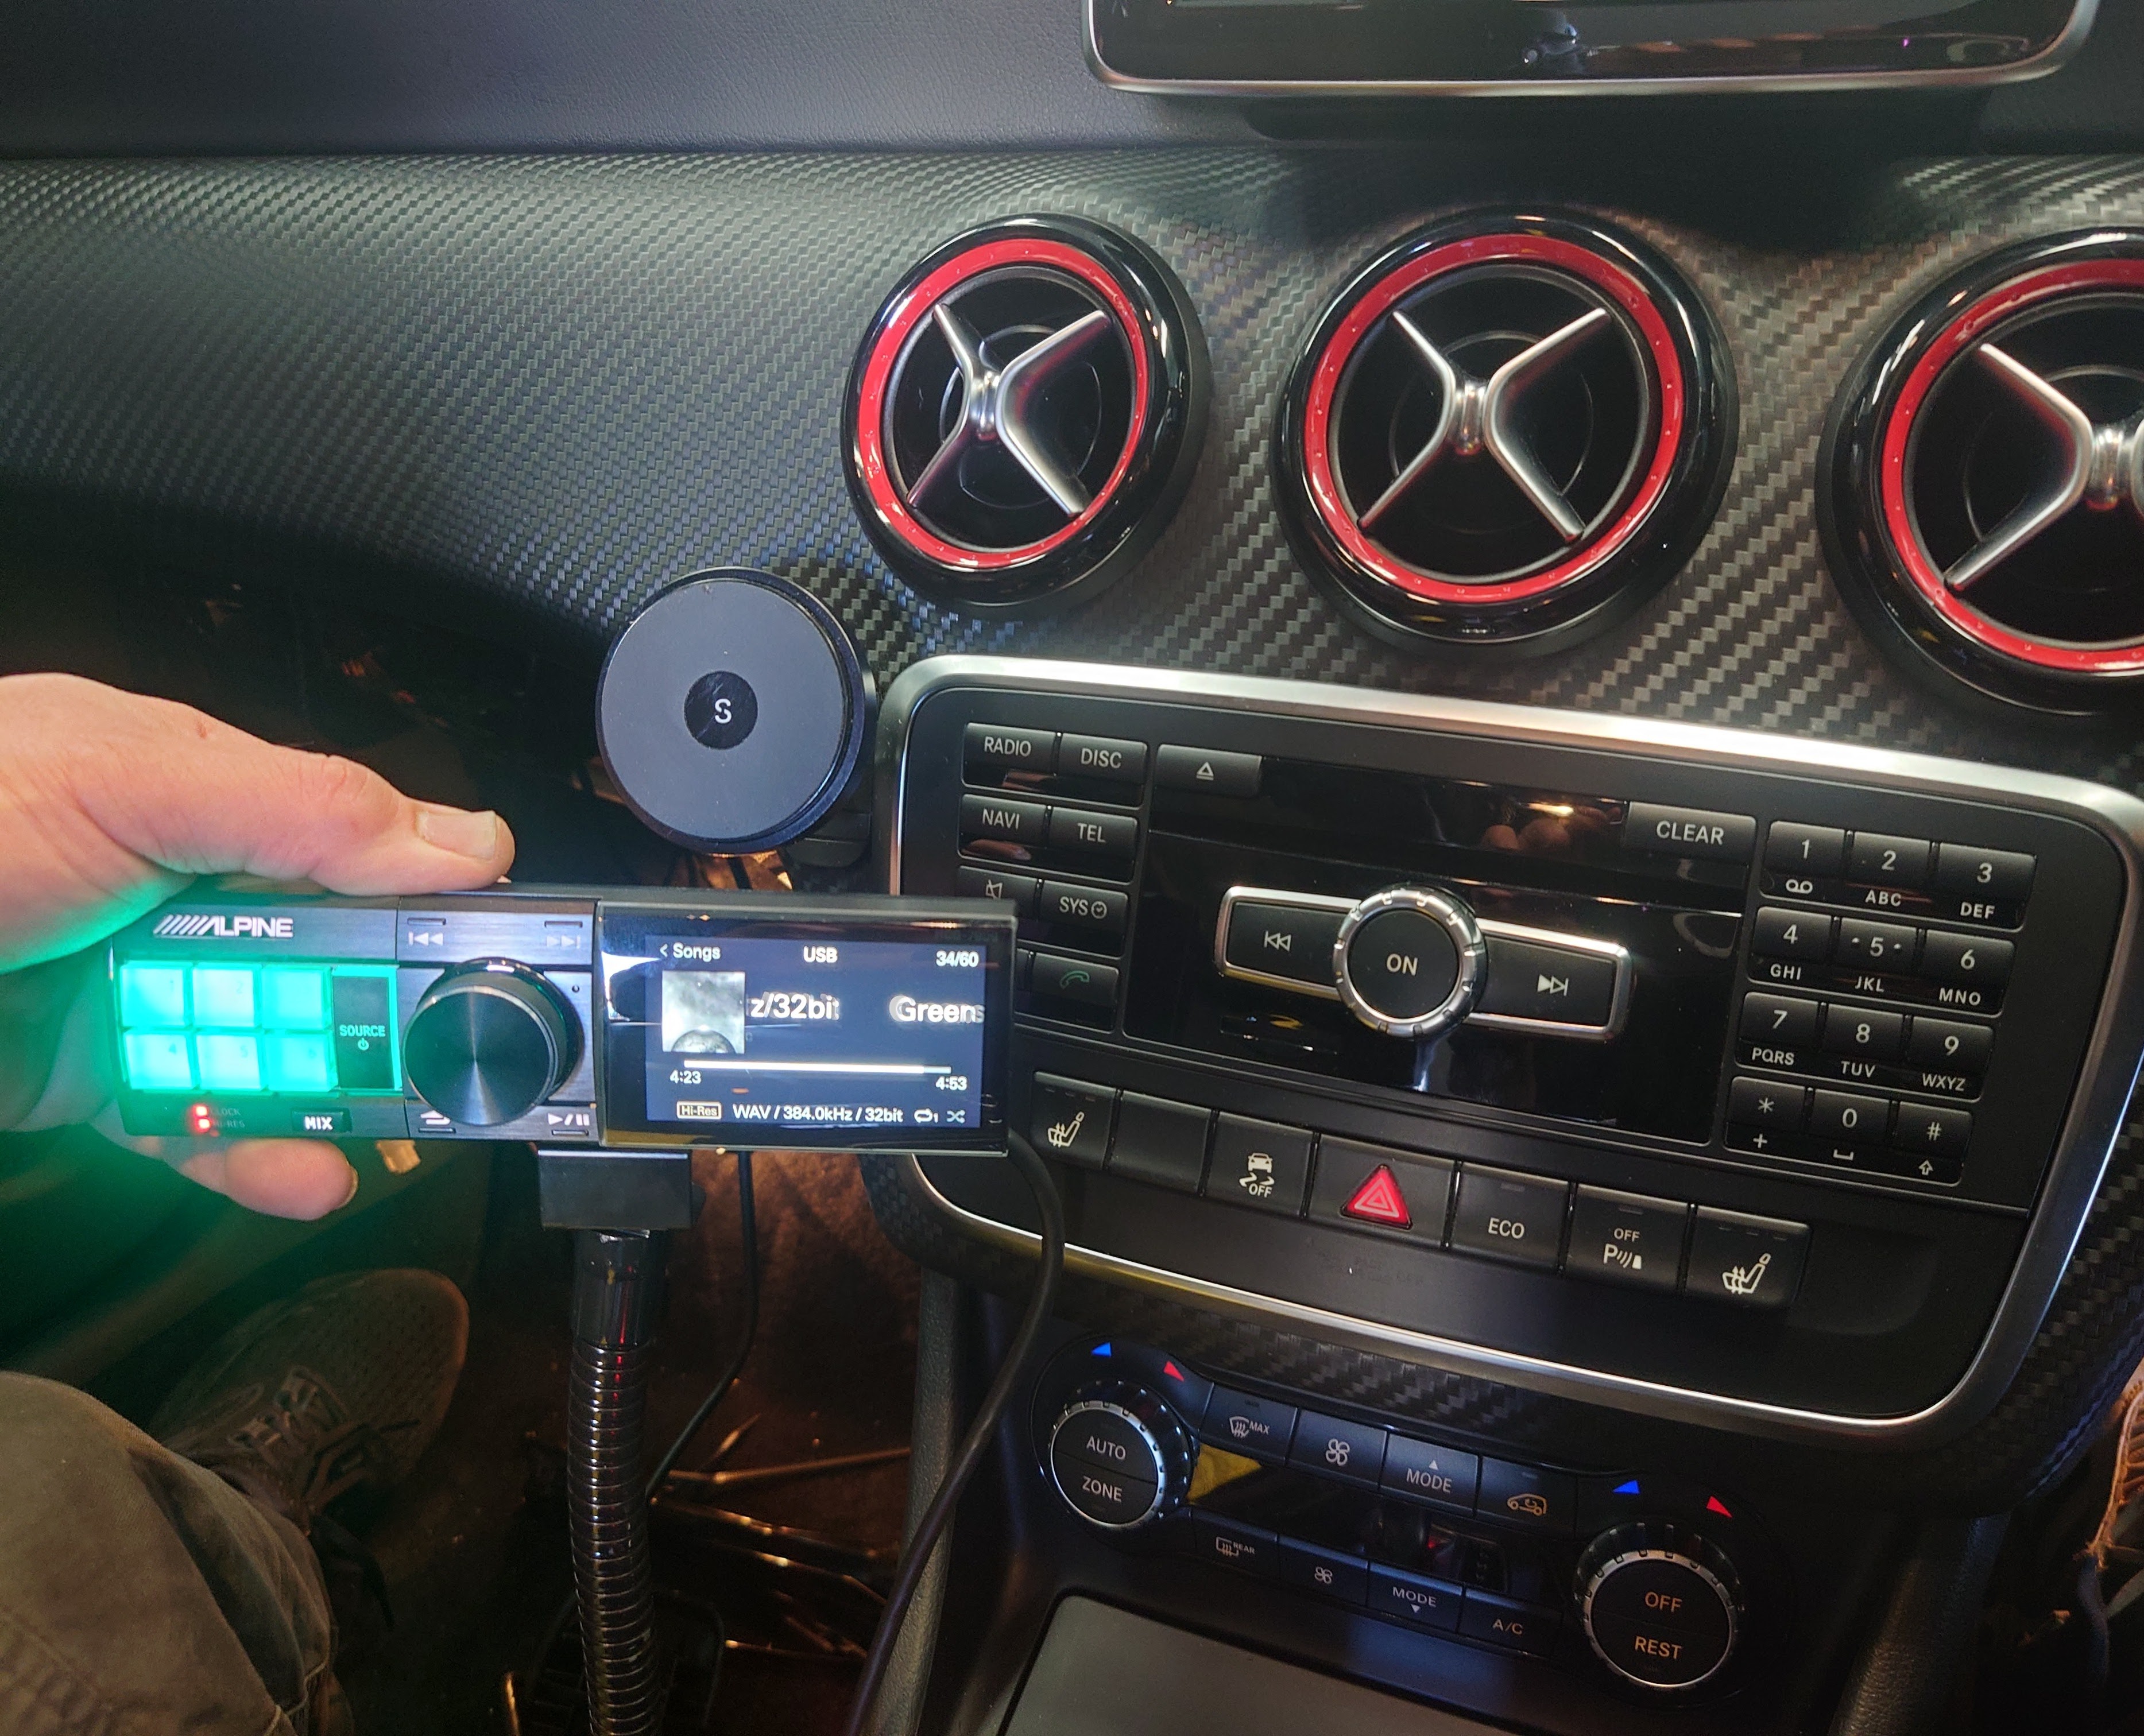
I see it a bit like how motor racing pushes cars further and the technology ends up in everyday cars. Even today the technology in Alpines 3rd generation F#1 status system is well ahead of anything in home audio, largely due to higher complexity of the car environment. The time alignment used can be adjusted in 0.9mm steps, which is far more precise than any traditional DSP. It uses an oven to maintain a precise temperature to the crystal oscillator used for the master clock to help eliminate timing errors(jitter). The data bus uses A2B and the processor has a 64Bit/1GHz processing power, to handle the huge amount of data in a 384kHz 32 bit Hi-Res system.

I was also lucky enough to work in an audio engineering company that fitted out some of the best studios in the world. I also have done time behind the desk mixing sound for live gigs and have my own little studio producing my own music on basically an hobby basis.

What I have learned in this time is unfortunately Audio and Hifi is full of myths and what we call snake oil. Now in many industries if you tried to sell products that didn’t actually do anything, you would go broke very quickly but in Hifi it seems you can get quite wealthy selling things that do nothing. To be fair our audio memory is incredibly short and unlike video for example where you can compare 2 or more screens side by side, in audio we are stuck listen to one and then swapping to another and trying to remember if and how the sound changed if at all, but with video screens you can literally see the difference at the same time. Selling speakers I have used comparitor boards where you can switch with a button press from one speaker to another, and had to stand there swapping speakers back and forth for 5 and 10 minutes over and over again, as customers struggle to remember what they literally heard a second ago as the other speaker makes that very hard to do. So when someone claims a cable improved their system, I am highly skeptical as that defies physics and engineering we rely on. It’s very hard to swap cables quickly and as our sound memory only lasts about 5 seconds or less, getting definitive results is virtually impossible, so we rely on anecdotal opinions, not science.

So despite people shouting loudly cables make a difference, I personally have never heard it and I have tried, there is no science to back up the claim and if it such a subtle benefit it is definitely not worth the high cost. I can play you music on a very basic system and then on a very high quality system and you will hear the difference easily, even if you are not someone into hifi or audio. I can’t do that with any cables.

Power cords. For some unknown reason people believe that replacing the last few feet of cable will somehow change the sound, ignoring the many meters of power cable in the wall that isn’t special or the 100s of kilometers from the power station. Clearly that fail to understand the power transformer that is inside every amplifier that makes this impossible. Ironically they happily admit that you should forget science and just listen yet when I do I still don’t hear anything.

Speaker cables and interconnect cables. Another area of magic. Even though science tells us you can’t have directional cables with an AC signal, apparently again we need to forget science and just listen. Same results for me but I do have less money trying to hear if this made any difference. Note some cables can be directional but its about the shield being only connected at one end, and certainly doesn’t apply to a speaker cable that has no shielding. The shield situation can help with a specific ground loop noise issue but cannot improve the sound.

Vibration dampers. These actually do reduce vibrations but only below about 20Hz so well below anything we hear and without any proof solid state components are effected by vibrations. Might be handy if listening during an earthquake but probably be hard to notice with all the distractions earthquakes usually bring.

Dots on the wall, speaker cone, and green pens to colour in the edges of CDs. Just buy a colouring in book as I have heard that can be therapeutic. The dots and pen do nothing

Now while I tend to think no rational person could be so gullable as to buy into this sort of voodoo magic, I then remember people also can believe in the stars in the sky predicting their future, so really shouldn’t be surprised these are multi-million dollar industries. Some people really want to believe and so are happy to ignore science and engineering, well, until they break their leg and then they’ll definitely opt for the drugs science has suggested instead of magic

Now with some hifi products the differences can be very subtle for example I swapped CD players and while there was no difference in spectral balance, I could hear better imaging and staging but I have had years of experience listening for that specifically and think most people may not notice, so think for most spending big on a CD player wont bring any significant benefit.

DAC’s. Again I have heard a difference on 1 specific test track that had with a triangle decaying and it was claimed you could in theory hear it decay out to 20 seconds. Using this track on nearly every system in competition judging, I could not hear it beyond 10 seconds until I heard it go out to 12 or 13 seconds with 1 DAC. That DAC was an $8000 DAC in 1990’s(Apogee DA-1000). Personally for such a slight and subtle change I couldn’t justify the expense but this DAC was mine and came with a system I picked up pre-owned and I on sold the parts of the system for more than I paid, so it was basically free to me. Apart from this one specific track I doubt I could ever pick this DAC out of a line up, so again I wouldn’t suggest anyone pay too much for something that does so little over the cheaper DACs that sound fantastic and measure perfectly when tested.

So with all my experience I highly recommend buy the best speakers you can afford as its the 1 area anyone can hear the benefits. Add a sub(or more) as we want all the octaves to play. Amps come down to providing the required power and the class is in my honest opinion is irrelevant. Ive heard great class A and great class AB and great Class D. I have also heard many cheap amps that I wouldn’t touch with a barge pole but I would never base it on the the class, only on if it sounds great or has issues and to me it is that simple, amps either sound great or they don’t, they have a hum, poor channel separation so image badly from crosstalk, or have poor spectral balance. Majority of them have none of these issues, so my advice is don’t go cheap and buy the amp that makes too many bold claims and remember the good amps will provide specs that back up their claims like testing with a 20-20K test signal, not a 1kHz test tone and will list a very low 0.00x THD figure.

Buy good quality cables but don’t waste your money on any that sound to good to be true as we all know what that means. Don’t waste your money on expensive speaker cables or inter connect cables, as you’ll never hear it unless you also believe in magic and horoscopes. Quality means you will be able to use them for years and they won’t fall apart but it doesn’t mean they will magically improve your system.

So be careful with your money and what you are prepared to believe and always listen and if you think you cannot hear a difference you will be totally correct so trust that instinct. If you think you can hear better results, then test that as much as you can before you spend your money to be 100% confident because if there is even the slightest doubt, then trust the doubt and save the money, as you can always use that money to buy more music or movies, and that is what it is all about

Good luck on your journey into this perilous area, its easy to be fooled but often very hard to get that money back if you are fooled.

Alpine F#1 Status (3rd Gen) Hi-Resolution Car Audio System

Alpine has produced 3 generations of the F#1 Status car audio systems. Each designed to be the absolute pinnacle of what is possible in a car audio system at that time. The first was a CD based stereo system, the next a DVD-Audio based 5.1 audio system and the current is a High resolution(384kHz 32 Bit) stereo system.

I was working at an Alpine F#1 Status dealer when the first 2 generations were launched and we sold and fitted them to several cars. At the time we were the only F#1 Status outlet in my country and worked closely with Alpine Japan. The president and head of engineering from Alpine Japan visiting our store on a few occasions.

Being a young worker at a car audio outlet at the time, I was unable to afford either of these cutting edge systems but was grateful to be involved with their installation and experiencing them first hand. Many years later when I found out a 3rd generation was being released, I decided I was going to move heaven and earth to be able to get myself this system. Ironically although I had done the original F#1 Status training and am quite capable of installing it, after over 40 years in car audio industry, the newest system is only allowed to be installed by an accredited F#1 Status dealer. I totally understand this and it wasn’t a problem as my F#1 status dealer is run by a guy I not only worked with but also trained, and have remained good friends with since that time.

This system isn’t something that is fitted in a few days and the process took several months but the results definitely justify the time it took.This obviously increases the cost as in my case a lot of custom installation was involved. This included 3D scanning my A pillar trims, so new custom trims could be made, which involved precise 3D printing of sections, so as to retain normal airbag function in the event of an accident. Note pic below was not the finished speaker pod as you’ll see in later pics

This 3D printed piece was so incredibly detailed, from the 3D scan that the factory trim clips were able to be used to fit it. This will insure airbags functionality won’t be compromised.

This pic shows the initial fabrication in the hatch area including the 2 amps and the processor, as well as the subwoofer box. The sub box took a great deal of work and time, as it is taken to a whole other level from here, including being shaped more and sprayed to match the cars factory paint.

Here you can see we needed to bond the 2 pieces we 3D printed to get a complete custom A pillar trim. This still isn’t the finished trim as many more hours were spent perfecting it before we flocked it(a coating) to make it look more factory

In this pic you can see the start of the sound deadening being applied. Although most door trims are held on with screws and clips. This one is riveted on, so the rivets needed to be drilled out and my installer actually had to buy a special riveting tool and special rivets, to be able to replace the unique factory rivets.

Below the amp rack, there is space for a very large lithium ion battery and the specialized electronics to charge and maintain it. This allows a fair bit of engine off listening time for demoing the system.

This pic shows the 6.5″ woofer. In all my years in car audio I have never heard a 6.5″ speaker get as low and deep as this one. Incredible midbass that makes it sound like an 8″ driver. Notice the Allen head bolts. It is the little touches that elevate a great installation.

Here is subwoofer box after lots of work and it was painted. If you compare it to first pic you can tell how much work went into getting it to look like this. Lots of filler and sanding.

The amp rack was also painted to match the cars paint.a lot of work for something underneath the amps and processor but its the little details that make the finished result so good

Here youcan see the false floor amplifier rack. The 2 amps are fitted at top and the processor in the middle. The trim piece here covered in vinyl will have glass fitted to it so this can all be on display

Here you can see the gear in place on amp rack. While the installation was happening the current president from Alpine Japan was visiting, so I asked if he would autograph my processor which he kindly agreed too.

Here is a pic of the 11″ subwoofer fitted in its custom enclosure. Again I am blown away by how incredible this speaker is and you would think it was a multiple sub set up from the sound and energy it produces.

Here you can see the glass was edge lit but I ended up turning that off as it highlighted any dust that is virtually impossible to eliminate in a normal car that is driven daily.

Here it is without edge lighting and I think this looks much better. We could have made beauty panels to cover all the wiring but I prefer being able to see it as wiring is a work of art.

We tossed a few ideas about where to fit the head unit/system controller pictured but instead of custom integrating it into the car, I managed to secure a 20+ year old Alpine goose neck mount originally designed to mount an EQ controller they made many years ago. I had actually been looking for this for several years, for an idea I had for my other car without any luck, when I found a guy who had a few NOS(new old stock) units. The odds of this were quite incredible but I was very fortunate. He also used one in the same way on the exact same system in another country. Great minds think alike, as they say.

In this pic you can see the goose neck but the controller wasn’t fitted ti it at this stage, hence the hand in pic holding it.

This pic shows the controller mounted and despite my fears, the goose neck is incredibly rigid and once set in position it will not move

In this pic you can see the flocking on the trim that helps it look factory and the gorgeous tweeter and midrange. The midrange sounds incredible and silky smooth as does the tweeter. The tweeter exhibits no harshness or brightness at even very high volume and the system is incredibly accurate and detailed across the range of music. The speakers completely disappear leaving the sound stage spread across the glass

Not a great pic due to reflections but here it is up and running.

The hatch area also has a carpeted MDF cover so there are no problems putting the shopping in there and other day to day practical things.

As this is an add on system(it keeps all the factory system in place), it has a function to mix the audio from the factory system into the music or feed it into this system. The Mix function is very handy as it allows me to use the factory satnav or take telephone calls without having to swap inputs.

After system was completed, it needed tuning of not only the overall sound but also the time alignment. The equipment used was well beyond what you would find in any normal car audio shop and was loaned from Alpine. It featured a dummy head with 2 inbuilt microphones in the ears and a dedicated processor, to accurately measure the timing and EQ results, and then that was used to help adjust the DSP time alignment and sound.

The dummy head was placed exactly where my head would be when sitting in the car. Then there was specific software to help read this data and also separate software to adjust the settings in the F#1 status system itself. The tuning was done over several days. Obviously I am incredibly happy with the results but also hearing what others think after a demo and seeing them blown away, and this is from experienced car audio sound quality competitors to others who have zero experience. It exceeds every ones expectations, so far. Playing anything, whether from Norah Jones, Kendrick Lamar, Billie Eilish to Dire Straights, if its well produced, it sounds amazing. The only thing I would say is a slight negative and I mean slight, is the volume control goes from 0 to 200 and so turning the volume up can take a few twists of the beautiful volume rotary control and is therefore slower than I’d like, but that is it and I can live with that

The system is unlike anything available and features advanced technology never seen in a car audio system before. The Digital Signal Processor(DSP) can make time adjustments that equate to 0.9mm so can be dialed in with more precision than we have ever heard before. Other systems the adjustments equate to 7.2mm, so this is 8 times more precise than other DSP units.

We use the time delay on certain speakers in a car, so the sound from the speakers that are different distances from our ears arrives at the exact same time. To achieve this it uses a more advanced crystal oscillator than has been used before. As oscillators will change their timing signal, as temperature changes, these units are fitted inside a heated chamber. Basically a highly regulated precision oven, so the temperature is constant even though the temperature in the car can very over an extreme range from below freezing to over 40-50 C and so remains exact and precise to a level never seen in car audio. The amount of data when using 384kHz 32 bit music is phenomenal and the system uses 4 advanced DSP processors that have 64Bit/1GHz processing power, 10 times the capability of other DSP units, so it can process high resolution signals without losing any detail and avoiding introducing any jitter(timing errors).

Below is directly from Alpines website

PERFECT SYNCHRONIZATION

The Problem with Jitter

Jitter, or clocking errors, occur when samples of a digital recording become misaligned due to having several clock references in separate components – common in car audio. While the file is transmitted between components and converted from a digital file to sound you can hear, each sample references a point in time and uses an internal clock to determine when that data should be played. Using CD as an example, 44,100 samples must be aligned to the original recording each second. If any of these samples deviate from the exact moment in time they are supposed to play, you experience jitter – subtle distortions and loss of music detail. When considering the incredible sampling rates High-Resolution audio is capable of, i.e. 384,000 samples per second, the problem of jitter can become even more dramatic. With the new Master Clock Management System at the heart of AlpineF#1Status, all transmissions and conversions are completely synchronized by referencing a single “master clock,” virtually eliminating all jitter in audio transmission.

About the OCXO DuCULoN® Crystal Oscillator

At the heart of the Master Clock Management System, the OCXO DuCuLoN® crystal oscillator was engineered with incredible accuracy. This ultra-premium component is located at the center of the HDP-H900 Audio processor where all the tuning of sound occurs. Shielded by a copper plate, the crystal oscillator’s location is protected from the influence of noise and temperature fluctuations that may happen in the vehicle. Two quartz crystals are housed in a dedicated, heat-insulated case along with a temperature control circuit which allows it to have 500 times the accuracy compared to a standard crystal oscillator. Ambient temperature changes can cause up to .002% of deviation of accuracy. To reduce that fluctuation to 0%, the oscillator is heated when the power supply is turned on. Once its temperature reaches a level where the clock accuracy stabilizes, the “clock” indicator light on the Head Unit Commander turns on, and the temperature within the clock is kept constant.

About Time Correction

While accuracy and performance are important factors to consider in a car audio system, having properly tuned speakers will determine the overall sound quality. It is also important that the system has high-precision tuning features to ensure High-Resolution sound quality. Inside a vehicle, sound arrives at different times to the listener, due to the different positions of the high, mid, and low-frequency speakers and the asymmetrical distance between the driver’s seat and the right and left speaker placements. Along with the time misalignment, the frequency response can vary between left and right speakers due to reflections and absorptions in the vehicle. To account for these discrepancies, a digital audio processor (DSP) is incorporated to make time corrections and equalization to the speakers so that the appropriate sounds arrive at the listener’s ears at the same time. To reproduce High-Resolution sound, the speakers must be tuned accurately. The below diagram shows a case where the gap in the timing between the left and right speaker is large versus small. The gap in distance causes the sound waves from both speakers to cancel each other out and produce distortion, which greatly affects sound quality. While in traditional products, the gap can only be adjusted at 7.2mm steps (at an ambient temperature of 20°C), the AlpineF#1Status DSP can be adjusted at 0.9 mm steps, 8x more precise than traditional DSPs. Because the listener is likely to notice timing differences, particularly in the high-frequency range found in High-Resolution sound, micro-adjustment capabilities like this are crucial in the car interior space. To achieve more accurate sound tuning, AlpineF#1Status has incorporated four of the highest-quality digital sound processors (DSPs) capable of 64Bit/1GHz processing power, similar to a personal computer’s central processing unit (CPU). This processor has 10 times the capability of traditional Digital Sound Processors, allowing it to process High-Resolution, high-spec signals without losing sound details.

About Carbon Fiber Reinforced Plastic (CFRP)

Traditional speakers are made with optimized materials and a structure suited to the specific playback bandwidth. For example, if the diaphragm is thinned and its weight is reduced, it becomes optimal for high-frequency audio playback, but will also hurt its low frequency capabilities. If the diaphragm is thick and rigid, it becomes optimal only for low-frequency audio playback but too heavy to play high-frequency tones. The challenge during the speaker production process is selecting materials that complement the characteristics of the speaker while overcoming disadvantages during playback. In other words, the material of the speaker directly impacts the sound during playback. To tackle this issue, AlpineF#1Status unified the tones of the speakers by unifying their material and structure. After extensive research, the best result was using Carbon-Fiber Reinforced Plastics (CFRP). With a lightweight, yet highly rigid material, CFRP is used as the diaphragm for speakers ranging from the ultrahigh frequency tweeter to the low frequency subwoofer. This is the first time the same cone material has been used throughout the entire system from tweeter to subwoofer in the car audio industry.

The Porsche 944 Resource List

List of useful links for 944 and 944 turbo owners

Clark’s Garage :- An incredible resource and first stop for all 944 owners. It’s the bible for all things 944. NB:- It hasn’t been updated in over 20 years as the creator unfortunately passed away, leaving this incredible legacy for us all. So keep in mind that recent knowledge may surpass what was known then, like resetting trip meter when moving being cause of odometer failure, when it is now known that the one gear turns to mush and movement is irrelevant. Its a time bomb. Also of conjecture is new struts causing hatch separation(close with 2 hands evenly) as twisting forces on frame are probably a bigger factor. Equally upgrade advice on turbos is very outdated, etc. Also it is LHD USA centric, so some procedures maybe different for RHD and ROW(rest of world)cars.

Click here for Clark’s garage

Rennlist:- Rennlist is a forum that has been around for many years and another great resource and an alternative to facebook groups. Any question you may have, have probably already been asked, countless time on Rennlist and it will always show up if you type your question into google because of this. Well worth joining IMO

Click here for Rennlist

Ftech9:- Joe at Ftech9 (Focus 9 technology) was one of the people behind the original Rogue tuning upgrades and chips(with Joshua), and is the developer of the solid state DME relay(a must have upgrade for reliability). He has now developed solid state DME(ECU)with OBD, for the platform and with the age of original units, failures are becoming very common. In my opinion its not worth fixing a faulty DME as it’s another time bomb so replacing with these or another option is a far smarter course of action

Click here for Ftech9

VEMS:- Versatile Engine Management System. This a fully tunable plug n play system which replaces the factory DME and allows car to use a more modern ECU with all the benefits that provides. I personally use this system and am a big fan. I really like it has autotune. A feature that allows me to to tune the car, after making changes or modifications by driving it and it self tuning. Most alternatives require car to visit a dyno tuner after changes, so this a huge advantage for this car. It also uses VE type tuning, so allows removal of the aging and problematic Air Flow Meter, that is no longer available from Porsche. Note system will be even better(like any ECU) with proper dyno tuning.

Click here for VEMS

MAXXECU:- A recent option being primarily developed by the guys on the Facebook Premier 944 Turbo and 968 Turbo group(The best people with knowledge of all things 944 turbo IMO). The plan is too use this either with a custom harness or with a harness being developed with Kroon(see below). This option using either the MaxxECU Pro or MaxxECU Race, is currently being developed and should be the best option for the hardcore turbo owner wanting the absolute best tuning option with the support of the most knowledgeable community behind it. Once the Kroon harness is done, you will have a base tune and replacement harness to take the 944 turbo to the next level. Join the facebook group and stay tuned

Click here for MaxxECU

MegaSquirt:- This is another stand alone ECU that has a big following on Rennlist. This has pro’s and con’s. Pros are its fairly cheap and has a huge following, so a large community behind it to tap into. Cons are you probably need to know a lot about tuning and stand alone’s, as you will not only need to do a custom install and wiring, but also need to be pretty hard core into tuning.

Click here for MegaSquirt

Augment Automotive:- This UK based company has a plug n play upgrade(Augtronic) to the DME that allows 3D tuning, bypass of the problematic AFM, using a MAF or Map set up, and a host of other features. Check it out on their website

Click here for Autronic DME upgrade

Clewette Engineering:- I honestly don’t know much about this system but a friend online suggested I include it as he is using it with great success. It uses the Electromotive TEC-gt200 ECU and apparently it comes with a base tune, coil pack, wide-band O2 sensor, etc, and wiring for a custom harness. It also features autotune, and has good support from Clewette.

Click here for Clewette

Racing Dynamics:- These guys make a very high quality front strut brace. All the racing 924/944 versions had a strut brace in them, as the strut towers can flex when car is pushed hard and a brace reduces this dramatically. The racing dynamics strut brace is incredibly well made and fit and finish is amazing. I say this with a caveat as mine arrived with a wonky sticker, probably put on by a drunk work experience kid. I had to remove it as it triggered my OCD. Despite this I highly recommend this brace

Click here for Racing Dynamics

DRS Developments:- Jan at DRS only has a few products listed on website but also makes some very cool Carbon Fibre parts for our cars including a replica factory(RS) racing bridge spoiler, and a lower rear diffuser. Both are stunning

Click here for DRS Developments

Adjustable Voltage regulator:- I only found this recently and am about to fit it. The ordering set up on page can be a little confusing but you need to order the external adjustable voltage regulator. This allows you to set an exact voltage. I will be setting mine at 13.8 volts

Click here for adjustable Voltage regulator

Kroon Wiring Harnesses:- These guys have been making complete replacement engine harnesses for years and recently added the 944. The quality is amazing and if you need them to add wiring for other sensors they can add them in. Arguably better than the cars left the factory with.

Click here for Kroon Wiring

Upgraded head light harness:- Many complain of very bad performance from headlights and that is often caused by the original wiring harness to lights. If you measure voltage it may be as low as 8-9 volts due to corrosion and old wires. Thankfully you can buy an upgraded harness that takes it power directly from alternator and uses new relays. It plugs into existing harness(plug n play) to get control signals for high and low beam but will provide head lights with proper voltage and noticeable improvement in performance. Search on ebay for “Porsche 944 uprated Headlight wiring loom harness”

No link due to ebay relisting item every few weeks

Fabspeed Exhaust:- (TURBO ONLY):- Fabspeed make what is arguably the best exhaust system for the 944 turbo. The quality and finish is outstanding, and it sounds amazing. I have been using the cat back section for 10 years and it still looks brand new with only light polishing every 2 to 6 months using autosol polish. I have just ordered the front section with catalytic converter to have a full 3 inch system

Click here for Fabspeed

Hatch Pin Receiver Repair Kit:- The rear hatch on these cars is prone to rattle and shake, which is not only annoying, it could impact with de-lamination of glass. I tried other cures before with no luck. These ones from 944 online did the trick. Fitting these made all the difference and totally eliminated the rattle I had. The car is soooo much quieter once this is gone. I put it up with it for much longer than I should but fitting these was the cure. I needed to make a slight adjustment to the pins but was a simple install. I also cleaned and lubricated the release mechanism while I was in there

Click here for repair kit

Short Shift and shifter Kit:- Only 944 sell a great short shift kit and a replacement shifter that tightens up and gets rid of excessive play in shift lever. My car didn’t suffer from much play but the shifter still improved it. Note you’ll also want to add the new dampers made by 3D printed porsche parts sold on ebay. These parts are also a must have IMO and well worth doing. You’ll need shifter, short shifter, and linkage.

Click here for only 944

Turbosmart:- Turbosmart make several products that are great for the 944 turbo. One of the most popular is the 25mm Kompact Plumb back re-circulation valve. The re-circulation valve diverts the air away from turbo when the accelerator is backed off, like when changing gears and protects the turbo. The factory has a plastic unit that can leak when on boost. A well know vendor sells a shiny Chinese unit, that is available on eBay and various places much cheaper but shouldn’t be used at all as unlike the Turbosmart unit, it doesn’t have good seals, so although shiny, it has same issue as an old factory unit. Be careful though as the Turbosmart unit fits the opposite way to factory unit. See pic

Fitting this unit ensures no bleed off of boost

Click here for turbosmart

Wastegates:- There are only 4 options I would consider(although many more options on market). The issue with the factory wastegate is it its valve is forced into the exhaust stream, it’s slow to respond, and its limited in control options. A popular vendor modifies these to be dual port, which is good, as dual port gives better control, but bad as it still forcing valve into exhaust stream and still slow to respond. I would not use this type. It’s slow to respond and old technology, and hurts spool up speed. The 4 options I’d consider, can be separated into 2 types. Bolt on with common adapter plates, and ones that need some fabrication to fit. The 2 bolt on options are the Tial F38 which I am currently using, and the Turbosmart Ultragate38 which would be my choice now, as it is the very latest technology and IMO is the leading wastegate you can use(bolt on). The other 2 options require some fabrication to fit but will respond better again. They are the Tial F46 which is a great option if you can get fabrication done and the Turbosmart Hypergate 45. Tials are not sold directly from Tial, so no links provided but google will get you there.

Click here for Ultrgate38

Click here for Hypergate45

Manual Boost controllers:- The simplest and arguably most reliable adjustable boost controller is a manual boost controller. You can have them either in engine bay as a set and forget, or cabin mounted for adjustment on the fly. You can even get dual stage so you can swap between a lower and higher boost settings. The downside to them is they can’t react to throttle position, atmospheric conditions or RPM so are fairly crude by comparison to electronic, but are much simpler to set up and cheaper to buy

Click here for manual

Click here for in cabin

Click here for dual stage

Electronic Boost Controllers:- These are more versatile but also more complex to install and set up. The advantage they have over manual depends on the model but they can adjust how the turbo spools up, automatically adjust for atmospheric conditions, take into account gear car is in, and throttle position, rpm, and have multiple settings, etc. The downside is expense of not just units themselves, but also the set up, as they usually need dyno time to be set up correctly. Once set up they are vastly superior to any other type. I prefer Turbosmart as an Aussie company that is making the best products you can buy and constantly innovating and is now world famous for their products

Click here for turbosmart

Turbochargers Until recently, we have only had the same old vendors, selling the same old Turbos developed in the 90s. While a great option back then, things have moved on and improved a lot since then. The only option was to go it alone and get a trusted builder to make you up something custom, or doing lots of fabrication to get a modern turbo to fit. Now thanks to the hard work of a particular 944 turbo enthusiast we have the most advanced option ever. He basically has 3 variants that are then customised to your goals. That guy is Emanual Glasson, many of us know well from Premier turbo group on facebook. He has been developing his turbos for the last few years, and I am about to fit one to my car. The Turbos are the “Voodoo”, the “Ultraspool”, and a “Xona Rotor Billet”. He is also making flow matched down pipes, mounts, headers and exhausts. This has all been done through his own initiative wanting a decent option for our platform. You will not get a better option than this. His website is linked below but reach out on facebook, as he is still getting everything sorted. I am about to fit an Ultraspool and it is a work of art

Click here for M44performance Turbo’s

Standard K26/8 Vs Ultraspool

Radiator Drain Kit:- So many tasks in the engine bay require the coolant to be drained and for me, I did it once, got coolant everywhere and then ordered this Lindsey Racing kit and never looked back. It’s an issue on all 944’s but especially bad on turbo and S2. It’s a very simple product and you could probably source the parts to do it pretty easy but if like me then this is easiest solution. My mechanic loves it too

Click here for LR drain kit

M44 Performance:- M44 Performance first few products are now being sold through 944 online. I just bought the Billet Head Stud Super washers. These are designed to spread the load when clamping the head back down. In future they will be selling turbo’s, exhaust headers, full exhaust systems and more

M44 Performance on 944 online

Adding colour fill to shift button shift pattern

I bought a used alcantara shift boot a while ago that had the shift pattern in red and always liked it. After trying various shift boots over the last 10 years and never being really happy with how long they lasted, I decided to bite the bullet and pay for a genuine Porsche shift boot. The boot comes mounted with the shift knob and I’m really happy with it despite the expense, as it should last year’s with proper care

While the shift boot and knob is awesome, the button with shift pattern looked bland compared to the Alcantara boot I had. I decided to fill in the indicator part with guards red touch up paint. I practiced on an old button I had and thought I could just swap buttons if it worked out.

It worked out perfect however I soon realised that I couldn’t get the new button out to swap them.

The problem was I didn’t want to damage the new leather and it soon became clear that I would damage it trying to pry it out. So plan B was to do it in the boot.

First step was to tape up around the edge. I could pry it up about a millimetre which was enough to get tape under edges. I then used some guards red touch up paint to fill the grooves of shift pattern

Basically it’s just a matter of over filling where grooves are. I needed to do it a few times as paint shrinks into grooves a little, when it drys, so to get it level took a few fills and sands

Then I sanded it down with 120 carefully, then 220 till I was happy. I then smoothed it with 1200. I wrapped the whole boot in newspaper to prevent getting any clear on boot

Once it was ready to go I gave it a coat or 2 of high gloss clear and put on a window sill, in the sunshine to dry

A few hours later it was ready to go into the car. I’m very happy with the result

944 HVAC fan only working on 4(max)? How to fix

Thankfully this is an easy fix. The resistor pack gets crud built up on it from being in engine bay, exposed to the elements.

First step is to remove the rubber strip that hold front of cowl over heater blower fans

Once that’s off cowl lifts up at from and you can access resistor pack and disconnect black plug for wiring

Then remove the 2 screws, one at each end.

Once out remove rubber gasket and put it to soak for about an hour in white vinegar. I used a toothbrush to give it a light scrub too

After it’s soaked for an hour let it dry(I used kitchen paper towels to speed up drying). Once dry, refit and you should have all fan speeds working 👍

Hiding a boost controller in plain sight

My mission was to mount a boost controller as subtly as possible.

I decided on using a turbosmart e-boost street as it’s a compact unit, has 2 boost settings and can be switched between those settings with an external switch, and it’s red LED display would shine through smoked plexiglass.

First step was to remove front of eboost street. The panel is held on by the 2 small Allen bolts but the rotary controller was permanently mounted through a small whole meaning front cover was captured by it. So to take panel off required some delicate work with a cutting wheel on a dremel.

I then marked out on the Plexi where it needed to be mounted and where the rotary controller and display were and holes for Allen bolts. I then drilled the holes. I had to buy some special hole saws for the Plexi as it’s very easy to crack and ruin the piece. The hole saws worked perfectly and I was able to check fit it

The Plexiglass was then sprayed with black paint on rear except for the area of the display.

Once the unit is mounted the panel looks completely black and blank, but the display shines through the dark tint when working.

A single din trim panel with clips on the back, to hold it in place, was cut so e-boost controller would fit through it. I then used high strength double sided tape to secure the Plexi to it. It’s the same 3m tape used to hold trim pieces into the outside of cars.

I had to file edges to get a good fit into the console. I then decided to add a Porsche sticker in white to it and it was ready to fit

The final result below turned out great and I’m really happy with it

Building speaker pods for ribbon supertweeters

To make these I started with a new product I read about called Apoxie Sculpt. It’s a 2 part epoxy used for sculpting and making prototypes. You mix part A and B in equal measure and begin sculpting. It sets within 24 hours but you can scuplt it for several hours, so super easy to use. Once set it can be sanded, then painted etc.

The Pioneer Carrozzeria ribbon supertweeters TS-ST910 are only sold in Japan, so we’re sourced via eBay and replaced the much cheaper Sony set I was using. As my system is Hi-res, these supertweeters play from 18kHz up to 100kHz. Now most humans over 15 years of age are lucky to hear above about 16kHz so most would think these would be pointless but music is harmonic in nature and since the 70s and 80s we have known that reproduction of frequencies above our hearing range effect the timbre and tonality of the notes we do hear. If you hear a violin live these harmonics are produced but a recording limited to our hearing range would cut off these harmonics. Harmonics are sounds in higher octaves that resonate with the primary note being played. Yamaha introduced a CD player very early in CDs life that went up to 30kHz even though CDs were limited to 20kHz based on this knowledge of harmonics. Brands like Rotel also made amps that went up to 50kHz in the 90s for same reason, so although Hi-res is relatively new, the theory behind it isn’t. Many may argue it’s just marketing but all I know is my system sounds amazing and the ribbon tweeters lifted it to another level.

I started out by using the trims(cups) for flush mounting and added some plastic pieces to help seal off the back. The speakers are sealed so this was only to aid making the mount and not for acoustic reasons. I glued them on with some JB weld 2 part epoxy glue.

I then used the sculpting putty to seal the plastic pieces in. These bits had holes that lined up with the bolt holes in tweeters for securing the speakers into mounts.

Once I had the rear of mounts to a point I was happy with I began working on molding the mounts into position on the car.

This involved adding lots of putty and physically sculpting it in the car. I started making just one side as I find the knowledge gained makes second mount easier and any mistakes aren’t done twice, so only need to be rectified once. It also makes second one a quicker process.

Once I was happy with fitment and shape, pod was sanded smooth and shaped then sprayed in high build undercoat. This was then sanded smooth ready for top coat.

I then painted the pod in gaurds red to match the car. It’s pretty loud colour and I think I’ll respray them again in a matt black to not stand out so much, but for now I’m enjoying the splash of colour

Then it was just a matter of rinse and repeat on second pod. I wore disposable gloves while playing with sculpting putty but it really was a simple as using play doh. Really happy I discovered it, as it’s very workable and gives you a great finish when sanded and painted.

The results

Is the 944 reliable?

I see many people asking is the 944 reliable and the answer is yes and no. Mine had a few issues when I got it but got them sorted and daily drove the car for 6 years, mostly incident free, then had some more serious issues(hard to diagnose) but now its super reliable. The engines on these cars are incredibly reliable, so most issues come down to a few other causes, mostly electrical, but in this article I’ll address those issues, and what can be done to get rid of many potential reliability issues for many years. It is just a general guide based on my experience and not a technical guide for diagnosis of problems.

DME, the sensors, and relay

Speed and Reference Sensors

944’s have an engine management system made by Bosch called a DME(Digital Motronic Electronics). It is a fuel injected system the uses 2 sensors{on most models later that changed to one sensor) known as the speed and reference sensors. These tell the engine management system(DME) what the pistons are doing and when to fire the fuel in and when to to trigger the spark plugs, etc. Unfortunately when people get a “no start” situation, often the first thing people suggest, is replace these 2 sensors. That’s not bad advice, as it is a possible cause, but replacing parts that aren’t faulty, not only gets expensive but won’t fix the issue, unless you are lucky and that it was actually the cause. As the wiring harness is very old now, often its not the sensors but the wiring back to DME, from the connectors at back of engine, that then goes to the DME box itself. You can buy replacement harnesses from Lindsey Racing and I highly recommend this. Personally I have replaced all the engine harnesses, as it gets rid of all potential electrical gremlins related to old wiring adding massive reliability

Click here to buy sensor harness

Click here for instructions on how to fit harness

The testing procedure for sensors is at a site all 944 owners should have bookmarked, called Clarks garage click here to sensor test page. This site has so much information and apart from some advice written over 25 years ago, that’s now a little out of date, the site is invaluable. One of the things it suggests is glueing an 0.8mm washer to an old sensor, to set depth of sensor. Do not do this because if that washer comes off, you are in a world of pain, as it falls into a place that is expensive to open up and also we now have a cheap tool to do the job Click here to buy tool. The reason you need to set depth is, its critical the sensors are the right distance to flywheel, to get an accurate trigger signal for DME. If you can get sensors out without removing bracket, then you don’t need to set depth again. Unfortunately more times than not, the bracket needs to be removed to get old sensors out.

There is another alternative to fitting all new harnesses from Lindsey racing, which is what I did, and requires fitting them into factory connector at DME, which can be a bit daunting(but isn’t that hard, as long as you are patient and methodical), is to buy a complete harness. Recently a company called Kroon wiring decided to support the 944 community and is making complete replacement engine harness. This isn’t a cheap option but the harness is probably better built than when car left the factory, so will ensure reliability for many many years to come and just plugs in to DME and avoids the fiddly work needed with the Lindsey racing replacements to be fitted in factory DME connector, although obviously both still need to be hooked up to everything in engine bay. Its also possible for them to wire in custom integration for other non-original sensors, like to monitor intake temps or something, directly into the harness.

Click here to buy Kroon Harness

DME relay

The DME relay is used by the DME and ignition, to turn on fuel pump. For many years people often carried 2 or 3 in glovebox, as they are an old analogue relay, that’s prone to failure at the most random and inconvenient times. Quality of replacement vary and I had a lot of problems with ones I had, so genuine Porsche are the best but we now have an option that should mean the end of being stranded by these. It a solid state relay made by Focus9 technology and I was a beta tester for them and been using one since 2016 and highly recommend them. They have 2 versions, standard which I use and pump prime that activates the fuel pump for 3 seconds before starting, to make starting easier. If buying today I’d get pump prime but have no issues starting with standard unit. Some people re-solder broken relays and get them working again but as they are only putting off the inevitable, I think the solid state are way to go for reliability.

Click here to buy Solid state relay

DME(engine control unit)

With my car the DME box(ECU) had a random problem when I first got it 10 years ago, and the guys I sent it too couldn’t work it out exactly what it was, even though it tested faulty, so sold me a rebuilt unit. Now we have more options and I wouldn’t suggest getting the DME rebuilt as its very old now, and there are several better options. Even if fixed, the age means it may cause further problems later, due to age and construction, and technology available at the time car was built.

Which option is best depends on a couple of factors. If you own a normally aspirated(NA) car(a non turbo), or a turbo, whether you don’t plan to modify it or not. One option is the Focus 9 technology solid state DME(ECU) replacement. This is made with latest technology and will outlast most of us. These guys reverse engineered the DME and then made a new version that is built with 40 years newer technology. It does require a core exchange. They also have a version for “spec” racing version that is a control class of racing, so cannot be modified

Click here to buy F9tech DME

The more advanced options, for those who either want to do modifications at some point or want to improve basic performance, like throttle response, is to go a tune-able set up. These allow the fuelling, timing, and other settings to be changed and are essential on turbo models, if you want to improve performance by upgrading turbos, injectors, etc, but they will still benefit an NA(whether the expense is justified on NA’s is another matter). They also allow changes to be made at any time and can be retuned to accommodate the new changes

VEMS

VEMS(versatile engine management system) is the stand alone system I personally use. My factory Air Flow Meter(AFM) had begun to play up and couldn’t be fixed. I could have bought a refurbished AFM, but as they are no longer made, so how long it would last is unknown, and they are very expensive refurbished. Buying a used one, then it may not even work at all, a gamble I wasn’t willing to take. I decided on VEMS because although, like all stand alone systems, a dyno-tuner can tune the car, it also has an autotune function, that basically self calibrates the system enough for it to be very drivable without the expense of dyno tuning time. It allows removal of the factory AFM, which not only improves air flow into engine but adds reliability, as it uses an Air temp sensor and wideband oxygen sensor for precise tuning. Far more precise than the original DME. It’s also a plug and play system that plugs directly into factory harness. It does require IAT(internal air temp) sensor and a wideband O2 sensor to be fitted, but that’s not complicated or expensive, and any decent mechanic can get that done easily or can be done yourself if you can weld the bungs required for sensors in. I added wasted spark ignition too, as it takes distributor out of equation, that needs parts that need to be maintained.

Click here to buy VEMS

MAXXECU, MEGASQUIRT, Motorsport Engineering and other options

These ECU’s are known as stand alone units, as they are a complete management systems. Some like Motorsport engineering are packaged into a plug n play like VEMS is, and others require a bit more work to install. Some come with a raw harness that needs to be installed, which is a lot of work, some with base tunes to get you going, and some that will not only require a wiring loom to be built from scratch but require dyno tuning before car will run and drive. They do offer virtually unlimited performance upgrades, with monitoring at the highest level of anything possible and you can add features like boost by gear, traction control, anti-lag and more, easily.

The thing about stand alones is, without the community support, you are on your own and either need to know how to tune, wire and set up yourself, or are at the mercy of your tuner and mechanic. That’s ok too, but if relying on someone else to install and set up, it is very expensive. Megasquirt has a huge amount of community support on rennlist forum, Maxxecu(new option for turbos and in early days) on the facebook group “Premier 944 turbo and 968 turbo group” and Augtronic and Motorsport Engineering by tuners in UK and Europe, as does VEMS, so making a decision between them, can be important just based on where you live, or based on your tuning skills and fabrication and wiring skills.

Click here to buy ME ECU for NA and Turbo Plug n Play

Click here to buy Megasquirt Plug n Play for NA 944

Click here to buy Maxxecu Race(basic)

Click here to buy Maxxecu Pro(advanced)

Click here to buy Augtronic

Vacuum Leaks

These cars have vacuum lines running all over the place in the engine bay and even in the car for the heater control. The original lines often have leaks that can cause all sorts of problems. These should all be replaced and you can get kits or just buy silicone hose yourself. Although you would think that replacing them would solve any vacuum issues, there is one other place a leak can cause an issue, and that’s the throttle body. The throttle body is meant to be sealed and a leak can mean the DME is getting the wrong reading of air going into engine, so car will have incorrect air to fuel ratio, and can run poorly

Click here to buy throttle body reseal kit

Click here to buy vacuum lines

Fuel Lines

More than just a reliability item, these are a safety item too, as having the car burn down does effect the drive-ability a bit. The original fuel lines can split and fuel is under tremendous pressure so if they go, its right over a hot exhaust. You can buy braided lines but I prefer aeroquip fuel lines, as it means they are easy to visually examine as they age. The lines at rear are less of an issue regarding an instant fire, as not over hot exhaust but also a good idea to inspect regularly and replace if needed.

Click here to buy Fuel lines

Grounds

The importance of good grounds can’t be over stated. Luckily it costs nothing to clean and reattach them. On some cars ground straps from battery may need to be replaced. For the engine, the ground point is just near the speed and reference sensors at the back of engine between bell housing and firewall. Cleaning is just a matter of removing them and cleaning area of grime and cleaning the terminals with light sanding. There are I think 7 ground points and its a great idea to clean them all. It varies from models being LHD and RHD but there are diagrams online that show you locations. As everything from DME, sensors, and gauges, require a good ground signal, it’s definitely worth doing and free

Is my car reliable?

I bought my 86 turbo in 2010 (today, so its our anniversery 🙂 As mentioned above I had a problem with DME when I first got it but had that sorted a few weeks later. It went great and I was driving it everyday but occasionally I’d have the dreaded random no start. it was very rare but also very frustrating. I could always roll start it, so always parked with that in mind and often had work colleagues who would get roped into helping. I actually put up with this for about 6 months while searching online for possible solutions. I read that you could sometimes jiggle wires at back of engine where speed and reference sensors connect to factory loom and car may start. Sure enough it worked and I realised it was the factory wiring back to DME that was the problem. I ordered the Lindsey racing replacement harness and as I am down under and shipping here is so expensive, I thought I may as well get some other things at same time. Luckily one of those was the fuel injector harness. Now when the stuff arrived, I kept driving for a bit using jiggle method if the car wouldn’t start, but when I finally got around to fitting the harness, I thought it made sense to look at fuel injector harness too. Although I hadn’t had an issue with it, when I touched the connector at the injector, the factory harness broke off in my hand. I then fitted the new fuel injector harness. I realised I’d dodged a bullet, as it was just a matter of time till that harness would have broken and left me stranded and scratching my head to the cause. This is why, if you want a reliable car, I think the harnesses are so important.

When I started to have the issues, that the worn out Air Flow Meter(AFM) caused, I tried replacing many parts to fix it, not know what the cause was. Often I knew it was unlikely to be the solution but figured at least the parts would be good for many years and I might get lucky and also some things I was planning on doing anyway. I was also between mechanics and so sort of stuck on my own trying to work it out. I replaced the fuel pump to a HV unit from Lindsey Racing, fuel filter, distributor, cap, leads, fuel rail(CEP), rebuilt injectors, Tial F38 dual port waste gate and Turbosmart electronic boost controller, AFR gauge(Zeitronix ZT2) with EGT, and probably a few other things I’m forgetting. I also had to fit most of these things myself, so learned a lot doing it and am far more confident tackling mechanical tasks these days

Once it was figured out it was AFM, I weighed up options and decided on stand alone. Initially I bought an M tune set up but couldn’t get car to run. This wasted a lot of time and money but I eventually gave up and bought VEMS. A few weeks later it arrived and once fitted to the car, she started first time and I’ve never looked back

So yes my car is very reliable and starts first time, every time, and I wouldn’t hesitate to take it on a long trip. Yes its had some issues as you would expect for a car of its age, but the majority of the time(90+%) I have owned it, its been driven daily and reliable. I have done the things to it, I think are needed, to make it reliable and will make any 944 very reliable. If you also want a reliable 944, then it takes a little work but if you address the primary causes of problems, outlined above, then these cars are very reliable and very few other cars have the engineering behind them mechanically, to do the sort of mileage these cars do consistently, combined with handling, style, and looks that are hard to beat.

Samsung Galaxy Note 10+

Samsung Galaxy Note 10+

galaxy_note_10_leak_ishan_agarwal_combo.0

Well, after many happy years using only Sony phones, I dropped my beloved Sony and the touch screen stopped working, rendering it a paper weight.  Unfortunately my phone company or any other phone company here in Australia, no longer stocks Sony or I would have got the new Sony X1. I wasn’t in a position to buy the Sony X1 outright, so a little reluctantly, I decided to go with the Samsung Galaxy note 10+. I have had the phone for a few weeks now, and I must say I am impressed. It is their flagship phone and it shows.

What I Like

What I like, and there is a lot to like in my opinion. Once you have navigated all the options it has, and got it set up how you like (which I feel like I might be doing for some time to come) the phone is fantastic. It is no particular order

The S-Pen. Being able to write out quick notes, using normal handwriting on the screen is very cool. Then being able to set a location to that note or a time/date, is fantastic. For someone like me, who comes home from shopping and then realises I forgot the one thing I went there for, it’s perfect. I can write a shopping list and then set the supermarket location, and then next time I pop into the the supermarket, the list pops up. Brilliant.

I  can also write emails or phone numbers in a note, with my handwriting, and then add them to contacts or send an email or convert to text,  or even chat using hand writing!! The handwriting recognition is amazing, if it can even read my chicken scratchings lol

I doubt I’ll use the gestures functions much, but being able to trigger camera via S-pen is really cool and handy and will definitely get used. The S-Pen uses Bluetooth and has what Samsung call gestures, that do all sorts of great things and what it can do varies depending on the app you are using.  In camera mode, you can zoom in and out, for example, as well as take pics, using the button on the S-Pen as a remote trigger for the shutter.

I can also write notes on the screen when the phones display is off, without having to activate phone or open the notes app.
Continue reading “Samsung Galaxy Note 10+”

So You Bought a 944

What Do I need to Do First?

First take a deep breath and let it soak in that you now own one of the greatest handling cars ever made. It is a car that was the benchmark for many other cars, like the RX7, because it was seen as the best of it kind at the time. The connection to the road is unlike most cars, and something most people have never experienced before, and it allows the driver to feel, in a more analogue way, the joy of driving, whether that is using momentum in a NA(normally aspirated) or having a blast in the turbo, which is still a very fast car despite it’s age(and can easily be modified to be even faster). So first thing is pull up a chair and just look at your gorgeous car.

First Things First

Some things should be done straight away, and if the car has no service history, some of these should be done before even turning over the motor, especially for cars that have been left sitting for many years. The engines in 944’s are what are known as an interference motor, and so if the timing belts break, the valves will hit the pistons and do expensive damage, and hence the importance of resisting the temptation to start her up and see what she will do. So first thing is to find out when belts were last replaced and if unknown, then replace them before trying to start the car. Most owners replace the water pump with every second belt change, as it is easier to do when the belts are off, so this should also be done at the same time if when it was last done is unknown.

Continue reading “So You Bought a 944”